Outline
- Hardware and Software Options
- Squid Proxy Installation & Conf
- SquidGuard Installation & Configuration
- Configure Client PCs and Devices
This article can help you install and configure Squid Proxy software and SquidGuard web filter on a desktop or server PC that runs Linux. I had recommended this procedure in my earlier post on Protecting Children from Inappropriate Digital Content.
Squid is an open-source proxy server software that caches web content. Web cache stores a copy of web pages and media files for a certain period of time. When that content is accessed multiple times by network users, it need not be downloaded afresh. This saves bandwidth, time and money.
Along with caching of content, Squid can filter web content and authenticate users. Only authenticated users will be allowed to access the Internet. Depending on the users who access the Web, Squid can vary the level of content filtering.
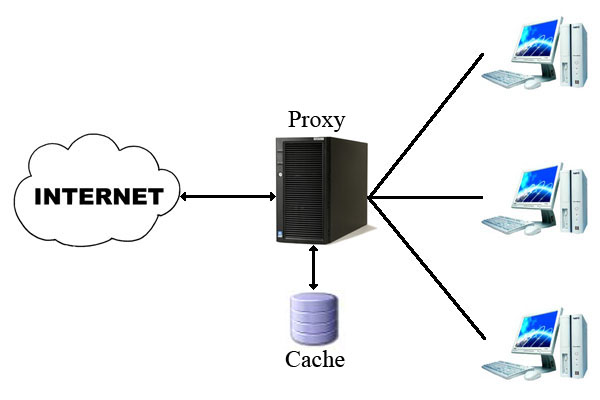
SquidGuard is a software that works together with Squid to filter web content. It has several “blacklists” of inappropriate websites. These can be customized. Users who try to access blocked websites will be redirected to a page that contains a message or warning. SquidGuard and Squid can generate reports of Internet usage of all authenticated users.
In my case, I installed these on Ubuntu 20.04 LTS. The instructions given here should work on Debian and other Debian based operating systems, and with minor changes, with other Linux distributions. (All trade names mentioned here belong to the respective owners.)
If you are on Microsoft Windows, please note that there is a Microsoft Installer package of Squid maintained by Diladele. However, it is based on Cygwin and it does not support user authentication and web filtering. Windows users might try Diladele’s Web Filtering Proxy with suitable customisation.
IMPORTANT: If you still wish to use Squid proxy with SquidGuard, try to use a dedicated Linux desktop (a server) as your firewall plus proxy. I discuss this option in the following section. For domestic purposes, this dedicated server can be a used PC or a mini-PC.
A Few Available Hardware/Software Options
For web filtering, you have a few options:
Option One: Install Squid proxy and SquidGuard on your desktop PC or laptop that is connected to the Internet via a modem/router. You may wish to choose this option because you have just one PC in your home or because you do not wish to spend money on a dedicated firewall-proxy. All devices and computers on this network will be configured to use the main computer as the proxy.
If this computer that doubles up as a proxy is available to children, there is a risk. Certain files and folders of the web filtering software SquidGuard will need open access by all users. If your children are old enough or smart enough to know this, they can delete your web filter system in no time! This is one reason why parents or schools prefer to use a dedicated device or firewall-cum-proxy server. They also secure the firewall-proxy and the modem/router it in a separate room or enclosure.

Squid proxy is installed on one PC. Other PCs, laptops, and phones are configured to use this desktop PC as the proxy.
IMPORTANT: Those configuration settings must be locked so that everyone in the house or office is forced to use the available network proxy. NOTE: Cable Modem and Router are usually integrated into one device these days – unlike what is shown in the picture above.
Option Two: Buy a dedicated hardware firewall that comes pre-installed with pfSense firewall. You can install Squid (how?) and SquidGuard (how?) on it. pfSense is a free software; the hardware they sell with pre-installed pfSense can be convenient but expensive. They have a range of equipment for all kinds of users and web traffic.
This pfSense device has one Wide Area Network (WAN) port to connect to the modem/router provided by your Internet Service Provider (ISP) and several Local Area Network (LAN) ports for connecting your computer(s) and your WiFi Router. Your mobile devices and laptops can connect wirelessly to this WiFi router.
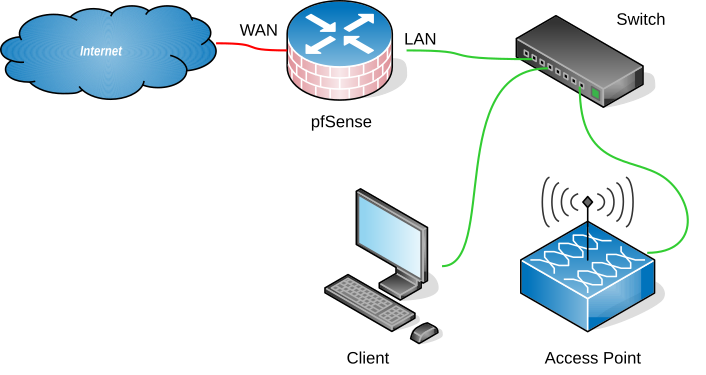
*This is a simplified diagram of a pfSense device that is connected to the Internet (WAN side). On the LAN side, a desktop PC and a WiFi access point are connected to pfSense via a network switch. More devices can connect via WiFi.
Option Three: Build your own dedicated low powered firewall PC (or use a spare Intel Celeron or Pentium based PC) as your firewall + proxy + web filter. This may be the cheaper option compared to a pfSense firewall device. This dedicated firewall must run 24×7. Power backup is essential. This hardware firewall should have two compatible Network Interface Cards (NIC) — one to connect to the modem/router supplied by your ISP; the other, to connect to your internal wireless router-cum-switch. All your devices and PCs will get their internet connectivity through the LAN-side wireless router/switch.
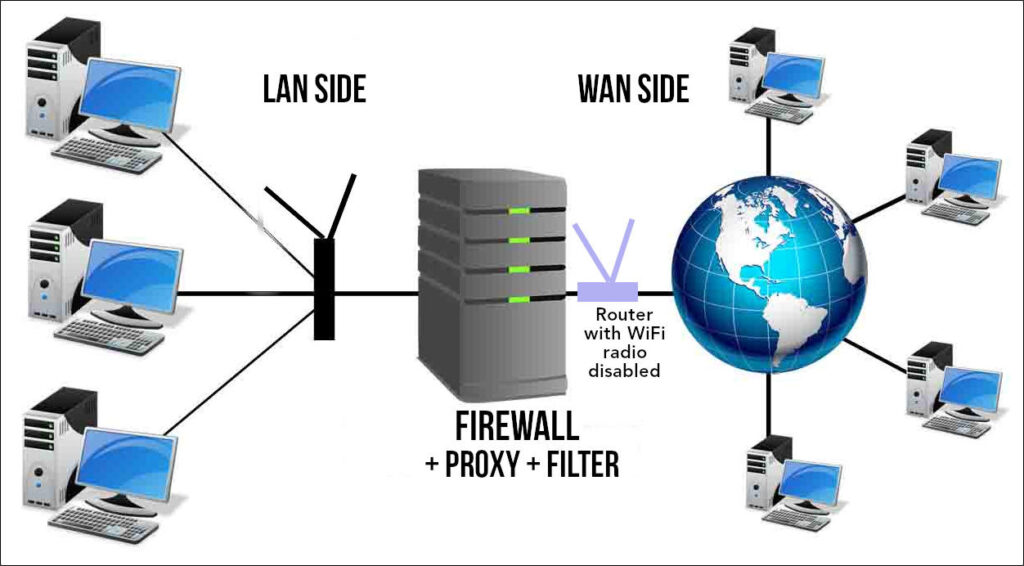
Your dedicated Firewall-proxy is connected by a LAN cable to the modem/router supplied by your ISP. If this router has a built in WiFi router, disable its wireless radio. You do not want anyone to connect directly to this router bypassing your proxy. The admin page of that router must be secured with a strong password. In addition, this modem/router must be kept in a secured room or box to prevent your children or staff from bypassing the firewall PC and connecting their laptops/PCs directly to the Internet using a simple LAN cable!
And what software do you install on your dedicated firewall-proxy PC?
Custom PC + pfSense software: On this dedicated PC, you could install the popular free firewall software pfSense and then install Squid (how?) and SquidGuard (how?).
Custom PC + IPFire software: You could install (how?) the free firewall software IPFire which comes with Squid proxy built-in. A web URL filter addon can be installed. Black lists from Shallalist or SquidGuard can be used alongside.
Custom PC running Ubuntu/Debian Linux + Squid + SquidGuard: Instead of installing pfSense or ipFire, you may just wish to install Ubuntu or any other Linux version. A dedicated firewall such as pfSense or IPFire is always more secure. But if that is not your priority, you could focus on web-caching using Squid and web filtering using SquidGuard. Later, you can configure firewall settings on that Ubuntu PC. It still needs two network cards.
Squid Proxy: Installation & Configuration
Installation
Squid package is available in the software repository of your Linux distribution. Use your software package manager to install Squid. Or, open a terminal (Ctrl + Alt + t) and run the following commands to update the software list and to install squid.
$ sudo apt-get update
$ sudo apt install squid
Now start Squid and enable it to run automatically at boot.
$ sudo systemctl start squid
$ sudo systemctl enable squid
At this point your Squid web proxy should already be running and you can verify the status of the service.
$ sudo systemctl status squidMake sure that ALL admin users who need to access the Internet through the firewall server (or the proxy PC) have user accounts on this server. All users must be members of the user group called “proxy.” Either of the commands can be used after replacing the appropriate username and groupname. The second command is useful to add multiple users to a group in one go.
$ sudo usermod -a -G groupname username
$ sudo gpasswd -M userA,userB,userC mygroup
Following are the locations of some important squid files you should be aware of. The user group called “proxy” must have write access to the folder that contains the logs and the log files.
- Squid configuration file: /etc/squid/squid.conf
- Squid Access log: /var/log/squid/access.log
- Squid Cache log: /var/log/squid/cache.log
$ sudo chmod -R +755 proxy:proxy /var/log/squid/Configuration of Squid Proxy
The default configuration file contains some configuration directives that need to be configured to affect the behaviour of the Squid. Before you edit the file, create a backup. Then, open this file for editing in your favourite text editor. Do not get intimidated by the volume of material in that file! There are hundreds of lines comments inserted for users. These lines begin with a “#” symbol. Squid ignores these lines. You may wish to take a look at the Squid version 4.1 configuration file.
# Create a backup
$ sudo cp /etc/squid/squid.conf /etc/squid/squid.conf.bak
# Open file for editing
$ sudo nano /etc/squid/squid.conf
Under NETWORK OPTIONS, search for the tag “http_port”. You will find lots of information related to its settings and options. At the end of all that information, there is a line that says, “Squid normally listens to port 3128”. Below that, there is “http_port 3128”. This is the default port the proxy server listens to for requests from browsers. Your browser, after configuration, will send requests to this port. You don’t have to change the default value.
To keep things simple, I have given below a basic configuration for your Squid installation. Since you have a backup of the original config file, you can delete everything from the squid.conf file and copy and paste these lines. When you learn more about Squid configuration, you can tinker with it. Before you save the squid.conf file, go through the paragraphs below and enter the correct IP address range of your small network in the acl (access control) statements. More information given below this code section.
# WELCOME TO SQUID 4.10
# OPTIONS FOR AUTHENTICATION
## BASIC NCSA USER AUTHENTICATION RULES
auth_param basic program /usr/lib/squid/basic_ncsa_auth /etc/squid/passwd
auth_param basic children 5
auth_param basic realm Squid Basic Authentication
auth_param basic credentialsttl 12 hours
acl auth_users proxy_auth REQUIRED
http_access allow auth_users

# ACCESS CONTROL RULES
# --------------------
# Defining an Access List
# Adapt to list your (internal) IP networks from where browsing should be allowed
acl localnet src 192.168.0.0/16 # RFC 1918 local private network (LAN)
acl localnet src 192.168.1.0/32 # RFC 1918 local private network (LAN)
acl localnet src 10.0.0.0/16 # RFC 1918 local private network (LAN)
acl localnet src fc00::/7 # RFC 4193 local private network range
acl localnet src fe80::/10 # RFC 4291 link-local (directly plugged) machines

## OPEN PORTS ##
acl SSL_ports port 443 # https
acl Safe_ports port 80 # http
acl Safe_ports port 21 # ftp
acl Safe_ports port 443 # https
acl Safe_ports port 70 # gopher
acl Safe_ports port 210 # wais
acl Safe_ports port 1025-65535 # unregistered ports
acl Safe_ports port 280 # http-mgmt
acl Safe_ports port 488 # gss-http
acl Safe_ports port 591 # filemaker
acl Safe_ports port 777 # multiling http
acl Safe_ports port 5900 #VNC Display:0
acl Safe_ports port 5901 #VNC Dispaly:1

#SSH
acl Safe_ports port 22 # ssh

# EMAIL
acl Safe_ports port 25 # smtp outgoing
acl Safe_ports port 110 # pop3
acl Safe_ports port 143 # imap
acl Safe_ports port 465 # smtp
acl Safe_ports port 993 # imaps
acl Safe_ports port 995 # pop3s

#RSYNC - if you use rsync
acl Safe_ports port 873 # rsync

#CALIBRE - if you use Calibre
acl Safe_ports port 8888 # calibre
acl CONNECT method CONNECT

# Recommended minimum Access Permission configuration:
#-------------------------------------------------------
http_access deny !Safe_ports #Deny requests to unsafe ports
#http_access deny CONNECT !SSL_ports #Deny CONNECT to other than secure SSL ports
http_access allow localhost manager #Only allow cachemgr access from localhost
http_access deny manager
http_access deny to_localhost #Protect innocent web applications
include /etc/squid/conf.d/*
http_access allow localnet #rule allowing access from local networks

############ CUSTOM RULES ########
http_access allow localnet # see "acl localnet" given above
http_access allow localhost # This computer where squid is installed

# And finally deny all other access to this proxy
http_access deny all

# NETWORK OPTIONS
#================
# Squid normally listens to port 3128
http_port 3128

# MEMORY CACHE OPTIONS
# ====================
# TAG: cache_mem (bytes)
cache_mem 1000 MB
# TAG: maximum_object_size_in_memory (bytes)
maximum_object_size_in_memory 1 MB
# TAG: memory_cache_mode
# Keep the most recently fetched objects in memory
memory_cache_mode always
# TAG: memory_replacement_policy
memory_replacement_policy heap GDSF #default lru
# Leave coredumps in the first cache dir
coredump_dir /var/spool/squid
Before you save your config file …
In the configuration lines given above, I have assumed that all your computers in the home network are connected to modem/router whose IP Address is 192.168.0.1 or 192.168.1.1. If your LAN side router’s IP Address is 192.168.0.1, then the router will issue your desktop PC and other devices IP Addresses in the series 192.168.0.2, 192.168.0.3, etc. To allow all devices in the “subnet” under this router or firewall to access the Web, I have included the access control rule:
acl localnet src 192.168.0.0/16
On the other hand, if your modem/router’s IP Address is 192.168.1.1, then it will issue your desktop PC and other devices IP Addresses in the series 192.168.1.2, 192.168.1.3, etc. To allow all devices in the “subnet” under this router or firewall to access the Web, I have included the access control rule:
acl localnet src 192.168.1.0/32
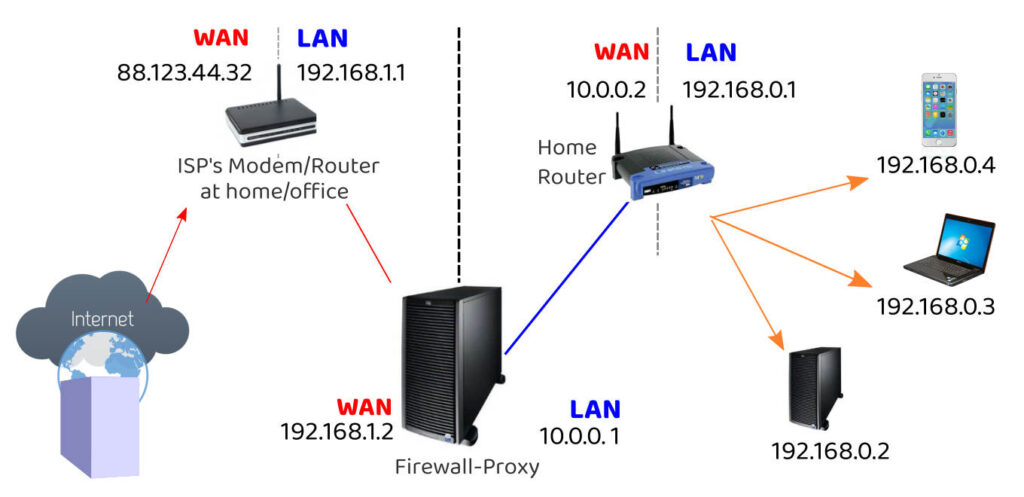
If your home network uses a dedicated firewall-proxy (as shown in the picture above), the ISP’s modem-router (if its LAN side IP address is 192.168.1.1), will issue the IP Address 192.168.1.2 to the “WAN side” network card of the firewall-proxy. The firewall-proxy’s “LAN side” network card might then assume (or be assigned) the IP Address of 10.0.0.1. All computers and devices connected to this firewall-proxy will get IP Addresses in the series 10.0.0.2, 10.0.0.3, etc, like the home router shown in the illustration. To allow all devices in such a “subnet” to access the Web, I have included the access control rule:
acl localnet src 10.10.0.0/16
Find the LAN IP Addresss of your modem/router or dedicated firewall-proxy (how?) to which all your devices get connected. If it is different from 192.168.0.1 or 192.168.1.1 or 10.0.0.1, make suitable changes to the acl rules. (Open your browser and type http://192.168.1.1 in the address bar. If you are able to reach the router’s admin login page, 192.168.1.1 is the router’s IP Address.) Try the other IP Addresses as well.
Memory Cache options in the configuration file determine the size of the web cache Squid will maintain on your proxy. You can change the size of the cache of the maximum size of the the objects in memory after reading more about these settings.
Remember to save the squid.conf file.
Setting Up Squid Proxy Client Authentication
To allow users to authenticate before using the proxy, you need to enable basic http authentication in the configuration file. But before that, you need to install apache2-utils package using following command.
$ sudo apt install apache2-utilsNow create a file called “passwd” that will later store the username for the authentication. Squid runs as user “proxy.” So, the file should be owned by that user. (We have already mentioned the file name “passwd” in the configuration rules. If you use a different file name or path, you have to make changes in the configuration file.)
$ sudo touch /etc/squid/passwd
$ sudo chown proxy: /etc/squid/passwd
$ ls -l /etc/squid/passwd
Now you can create a new user for your web access. If your username is “admin”, use the following command to setup its password.
$ sudo htpasswd /etc/squid/passwd admin
New password:
Re-type new password:
Adding password for user admin
Similarly, create other usernames and passwords for all users in your home or office.
It is time now to save and close the squid.conf file. Then, restart squid.
$ sudo systemctl restart squidSquid might take a minute to shutdown and restart. If you get any error messages, read those carefully and follow the instructions. The configuration rules given above are taken from a working installation. There shouldn’t be any errors unless it requires customisation according to the needs of your system.
Configure Client PCs to use the Proxy
Each PC or laptop that needs to use the proxy has to be forced to access the Internet via the proxy server.
- Each client machine’s Network Manager
- Client Machine’s Environment Variables
- Browser on the Client Machine
- The software package manager (apt, for example)
- Configure and enable a firewall
1. DESKTOP PC Network Settings
In Ubuntu, go to Settings > Network and change the Network Proxy settings.

On the desktop PC on which the Squid Proxy was installed, specify the http proxy as “localhost”.
While configuring the settings of other laptops or PCs in your network, enter the IP Address of the PC on which the proxy was installed.
If you have a dedicated firewire-proxy, enter the LAN-side IP-Address of that computer/device.
NETPLAN Configuration
Children or employees who know how to change proxy settings can easily alter the settings in Network Manager. It is therefore necessary to uninstall Network manager. In its place, you need to install “netplan” can specify proxy settings in its configuration files.
Uninstall Network Manager
$ sudo apt-get remove network-managerConfigure Netplan (if already installed). Open the configuration file /etc/netplan/netplan.yaml (or whatever its name is). It is a yaml file that should be carefully edited. Spaces and indentation have to be accurate.
$ sudo nano /etc/netplan/netcfg.yamlIt is a yaml file that should be carefully edited. Spaces and indentation have to be accurate.
network:
  version: 2
  renderer: networkd
  ethernets:
    enp5s0:
      dhcp4: false
      dhcp6: false
      addresses:
        - 192.168.0.2/24
      routes:
        - to: default
          via: 192.168.0.1
      nameservers:
        addresses: [185.228.168.10, 185.228.169.11]
The name of your network card may be different from “enp5s0”. Use the “ip add” command to find that out and make changes in the file above. In the example above, the IP address that is assigned to a particular client PC is 192.168.0.2. The IP address of the LAN side router is 192.168.0.1. In your case, it may be different. (I have used a set of DNS Name servers that employ Internet filtering of adult content as an additional measure). Computers that connect to my network are assigned IP addresses. Therefore, DHCP (automatic and random assignment of IPC addresses by the router) is set to “false.”
Take special note of the indentation of lines in the yaml code. The indentation is in multiples of 2 spaces. Save the file (in nano, use Ctrl + O). Then, bring these settings into force by this command:
$ sudo netplan apply2. DESKTOP PC Environment Variables
On each Ubuntu/Linux PC connected to the network, the environment variables (stored in /etc/environment) need to be edited so that your terminal and package manager will be able to access the Web to download files or install new software. Open the file to edit it.
$ sudo gedit /etc/environmentAdd the following lines to the file. Instead of “username”, enter your squid proxy username and instead of “password”, enter the squid proxy password for your username.
If you are editing the environment variables of the PC where you installed Squid, you may leave the “localhost” as is. On other computers, instead of “localhost”, enter the IP Address of the PC (or dedicated firewall or server) running the squid proxy server.
http_proxy=http://username:password@localhost:3128/
https_proxy=http://username:password@localhost:3128/
ftp_proxy=http://username:password@localhost:3128/
no_proxy="localhost,127.0.0.1,::1"
If you any special character in your password, replace it with the equivalent ASCII characters. For example, instead of @, use %40. That is, if your username is “teacher” and your password is “p@ssword” enter it like this:
http_proxy=http://teacher:p%40ssword@localhost:3128/Save and close the file. To ensure that the PC takes these variables into account, run this command:
$ sudo source /etc/environmentUser specific environment variables can be set in the hidden file “.bashrc” if necessary.
3. APT Configuration
On a Debian based system (eg: Ubuntu), software packages are managed by apt. For ‘apt’ to access the internet, configure the file /etc/apt/apt.conf
$ sudo gedit /etc/apt/apt.confAdd the lines:
Acquire::http::Proxy "http://username:password@localhost:3128";
Acquire::https::Proxy "https://username:password@proxy-server-ip:3128/";
Save and close the file.
4. BROWSER CONFIGURATION
You need to tell the Web Browsers on each client PC (and the server) to use the Squid Proxy you set up just now.
Go to the network connections settings of your browser. In the case of Firefox, go to Preferences > General > Network Settings.
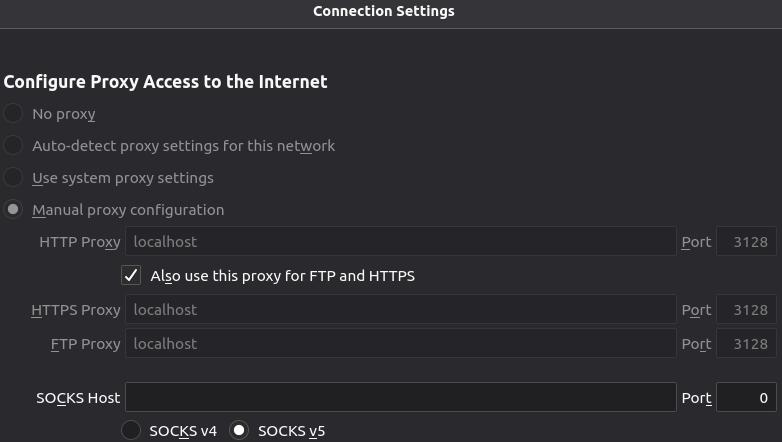
Choose “Manual Proxy configuration” and enter the IP Address of the computer on which Squid proxy was installed. If it was installed on your desktop, enter “localhost”. Enter 3128 as the port number. Apply the same settings for https and ftp.
Below those settings, under “No proxy for”, enter “localhost, localnet” (without the quotation marks)
Make sure that the option below that – “Enable DNS over HTPPS” – is left unchecked.
Click “OK” to save the settings and exit.
These steps have to be repeated on the browsers of all your computers. No other user must be able to change these settings.
I use Mozilla Firefox. There is a way to lock these settings in Firefox.
In your text editor, create a new file called policies.json and save it in a folder called “policies” in /etc/firefox folder.
Run these commands to create the file mozilla.cfg and to open it for editing in your default text editor (In Ubuntu, it is gedit)
$ sudo touch /etc/firefox/policies/policies.json
$ sudo nano /etc/firefox/policies/policies.json
Enter the following lines into the new file and save it. Change the IP address according the needs of your network.
{
 "policies": {
   "BlockAboutConfig": true,
   "BlockAboutProfiles": true,
   "BlockAboutAddons": true,
   "Proxy": {
      "Mode": "manual",
      "Locked": true,
      "HTTPProxy": "10.0.0.1:3128",
      "UseHTTPProxyForAllProtocols": true,
      "SSLProxy": "10.0.0.1:3128",
      "FTPProxy": "10.0.0.1:3128",
      "Passthrough": "192.168.0.0/24",
      "AutoLogin": true
    }
 }
}
Save the file. Restart the browser. Now, all of the preferences listed will be locked.
5. Firewall
Why will you need a firewall such as the “Uncomplicated Firewall” (ufw)?
- A knowledgeable user can change their system’s environment variables and proxy settings. He can then make his PC connect to your router directly bypassing the proxy server and filter.
- Certain browsers allow users more freedom because they oppose all forms of censorship. A user might then be able to bypass your proxy server.
- A firewall can be used to shutdown all internet traffic except toward the proxy server and to its dedicated port 3128.
UFW comes with most linux distributions. Use admin privileges to enable UFW and to add certain rules.
Your goal is to:
- Deny all outward connections to ports 80, 53, 21, 443
- Allow outgoing connection on port 3128 (to Squid Proxy)
- Allow outgoing DNS requests to OPENDNS servers
Log in to each client PC. Open a terminal and run these commands.
$ sudo ufw enable
$ sudo ufw allow out to 192.168.13.3 port 80  #squid
$ sudo ufw allow out proto tcp to 208.67.222.222 port 53
$ sudo ufw allow out proto udp to 208.67.222.222 port 53
$ sudo ufw allow out proto tcp to 208.67.220.220 port 53
$ sudo ufw allow out proto udp to 208.67.220.220 port 53
$ sudo ufw allow ssh
$ sudo ufw allow to 192.168.13.2 port 22

# Deny rules must come last
sudo ufw deny out to any port 80
sudo ufw deny out to any port 443
sudo ufw deny out to any port 21
MOBILE PHONES
When it comes to mobile devices, go the settings of its WiFi connection and enter the IP Address and Port number (3128) of your proxy server. IF you lock the Settings of your children’s phones with App Lock (find out how), you can rest assured that they will not tamper with those proxy settings.
Restart Squid
It is now time to restart Squid proxy.
$ sudo systemctl restart squidOnce squid has restarted, open your browser and make sure that you are able to browse the Web. If you are asked for a username and password, enter your Squid username and password.
SquidGuard: Installation & Configuration
It is assumed that squid is already installed and configured on your main PC or the dedicated proxy server.
I. Installation of squidGuard
sudo apt-get install squidguardII. Configuration of squidGuard
Download the Shalla Black Lists and save it to a secure location. Extract the compressed file. The contents will get extracted to a folder called “BL”.
A. Install the Black lists
Copy the folders inside “BL” folder to /var/lib/squidguard/db/
Each folder has to have text files DOMAINS and URLS containing domains and urls to be blocked.
For this, run these commands in a terminal. Make sure that the folder “BL” is your current working directory.
$ sudo mkdir /var/lib/squidguard/db/To copy the contents of the folder adv in “BL” folder recursively to the destination folder, use this command:
$ sudo cp -R BL/adv /var/lib/squidguard/db/ Similarly, copy all the folders in BL recursively to /var/lib/squidguard/db/
B. Install White Lists
Create a folder “whitelist”.
$ sudo mkdir /var/lib/squidguard/db/whitelistIn it, create two text files with names “domains” and “urls”.
$ sudo touch /var/lib/squidguard/db/whitelist/domains
$ sudo touch /var/lib/squidguard/db/whitelist/urls
Populate these files with domain names and URLs of web sites and pages that you DO NOT wish to filter out. These are approved web sites and web pages.
C. Edit SquidGuard Config file
SquidGuard conf file is /etc/squidguard/squidGuard.conf
$ sudo gedit /etc/squidguard/squidGuard.conf- Specify a new “home” for the squidguard databases. This is where you installed the black lists and white lists. Also, specify the path to a file where squidGuard should maintain a log. Make sure that this file’s permissions are set in such a way that squidGuard can write into it.dbhome /var/lib/squidguard/dblogdir /var/log/squidguard
- Specify Source Addresses (Users)Suppose you have a group of users that need to grouped as “admin” and a second group of users as “students”. Users “root” and “philip” belong to the “admin” group. Tom, Jack and Jamie belong to “students” group.src admin { user root philip}src students { user tom jack jamie}
- Specify DESTINATION CLASSES to be blockedFor every black or white list folder you copied into /var/lib/squidguard/db/, create a DESTINATION CLASS. For example, for the folder “porn”, create a destination class called “porn”
dest porn {
    domainlist porn/domains
    urllist porn/urls
} - Similarly, for the white list folder, create a DESTINATION CLASS called whitelist.
dest whitelist {
  domainlist whitelist/domains
  urllist whitelist/urls
} - Specify access control rules for the categories. If there is a whitelist, it has to be mentioned first in the list after “pass”. Note: Change url of web page that displays “access denied”.
acl {
    admin {
    pass whitelist news tracker !porn !spyware all
    redirect http://localhost/access-denied.html }
default {
    pass whitelist !news !wiki !adv !aggressive !anonvpn !chat !dating !fortunetelling !forum !gamble !hacking !imagehosting !models !movies !porn !spyware !socialnet !sex-lingerie !sex-education !searchengines !tracker !violence !warez !webtv all
    redirect http://localhost/access-denied.html
 }
}
In this configuration, members of admin group can access sites in the white list, news list and tracker list. They can access all sites except those in the “porn” and “spyware” lists.
All others follow the “default” access rule. They can access sites on the white list. All sites mentioned in other destination classes are inaccessible.
If either group tries to access a banned site, the browser will get redirected to a custom web page. (In the example shown above, “http://localhost/access-denied.html” is on the local machine. The assumption is that the local machine has Apache Server installed. In addition, a custom error page “access-denied.html” was deployed in the web root folder.) The custom web page can be any web page on the Web or on the Proxy server. You can create a custom access-denied page if you know HTML. Otherwise, redirect to a safe page on the Web.
If you wish to learn more about the available options in the configuration file – such as time based access control, etc. – please visit the SquidGuard documentation site to learn about extended configuration.
III. Important Final Steps
1. PROXY GROUP
If you haven’t already done this, make sure that every user whose password is saved for Squid authentication is a part of the “proxy” group. That is, run this command for every username registered in Squid.
sudo usermod -a -G proxy <userName>2. Initialize squidGuard
It is important to initialize squidGuard lists. This command will convert the text files of black/white lists to database format.
$ sudo squidGuard -C allEach time you change the black or white lists, you should run this command and then restart Squid proxy (last step given below)
3. CHANGE PERMISSIONS of squidGuard databases
$ sudo chown -R proxy:proxy /var/lib/squidguard/db* /var/log/squidguard$ sudo chmod -R 777 /var/lib/squidguard/db* /var/log/squidguard
$ sudo chmod -R 777 /var/log/squidguard
In most situations, 777 (read, write permissions for ALL users) is required. This is why the location of these files (if SquidGuard is installed on a PC used by children) must be kept a secret. The safer option is to go for a dedicated Firewall-Proxy device/PC.
4. CONNECT SQUID TO SquidGuard:
ADD this line as the last line of squid.conf. Open the file for editing using this command:
$ sudo gedit /etc/squid/squid.confAdd this line at the end of the file.
url_rewrite_program /usr/bin/squidGuard5. SquidGuard DRY RUN
This step is IMPORTANT. To verify that your configuration is working run the following command (changed to reflect your configuration):
echo "http://www.example.com 10.0.0.1/ - - GET" | squidGuard -c /tmp/test.cfg -d About the different entries of the echoed line:
- The first entry is the URL you want to test.
- The second entry is the client IP address. If you configured access control based on IP addresses make sure to test allowed and not allowed IP addresses to ensure proper working.
- In the third entry (the first – ) you can specify a username. This is only of importance if you have access control based on user names. Make sure to check different names with different access to verify your configuration.
Testing using playboy.com for different users – using their squid usernames (admin, kids, etc.) Change the IP Address to match that of your client computer.
$ echo "http://www.playboy.com 192.168.1.4/ admin - GET" | squidGuard -c /etc/squidguard/squidGuard.conf -d
$ echo "http://www.playboy.com 192.168.1.4/ kids - GET" | squidGuard -c /etc/squidguard/squidGuard.conf -d
Testing using wikipedia.org (if it is blacklisted) for different users – using their squid usernames (admin, kids, etc.) Change the IP Address to match that of your client computer.
$ echo "http://en.wikipedia.org/wiki/BDSM 192.168.1.4/ admin - GET" | squidGuard -c /etc/squidguard/squidGuard.conf -d
$ echo "http://en.wikipedia.org/wiki/BDSM 192.168.1.4/ kids - GET" | squidGuard -c /etc/squidguard/squidGuard.conf -d
6. Restart Squid
$ sudo systemctl restart squid7. Edit your White or Black Lists
Depending on your usage and experience, you may wish to remove some sites from the Black Lists or add a few sites to the White Lists. You should go to /var/lib/squidguard/db/ and change the appropriate entries in “domains” or “urls” files in the various folders. After each change, remember to repeat steps 2, 3, and 6 given above. Otherwise, the changes will not take effect.
Samuel Sundaram
Philip Eapen